A Realistic Step-by-Step Guide to DIY End of Tenancy Cleaning
It’s no surprise that more tenants are considering DIY end of tenancy cleaning. Moving costs in London continue to rise, and when you are juggling deposits, removals, and new tenancy payments, it is natural to look for ways to reduce expenses.
At Cleaner Cleaner, we have always explained why professional end of tenancy cleaning is often the safer option. Experience matters. Professional teams work in groups, use commercial-grade equipment, and understand exactly what landlords and inventory clerks check during inspections.
However, we also recognise that not everyone can set aside the budget for a professional service. And in many cases, especially when a property has been maintained consistently, a DIY end of tenancy clean is entirely achievable.
This guide will walk you through the process realistically: how much time you will need, how to prepare, the proper order for cleaning, and the professional techniques that make the difference between “looks clean” and “inspection ready”.
Read also: The Ultimate Guide to Cost-Effective End of Tenancy Cleaning
DIY end of tenancy cleaning may take more time than planned so make sure to start at least 2 weeks before your inspection date.
What to Consider Before Choosing DIY End of Tenancy Cleaning
Before committing to doing everything yourself, it is important to assess the situation honestly.
Check also: Our Hassle-Free Tenant’s Moving Guide
The Overall Condition of the Property
DIY cleaning works best when the property has been maintained throughout the tenancy. If surfaces have been wiped regularly, the oven has not accumulated years of grease, and limescale has been treated occasionally, bringing everything back to inspection standard is manageable.
If maintenance has been neglected, the process becomes more labour-intensive. Heavy limescale, thick grease layers, or long-term mould require repeated treatments and patience. It is still possible — but it will take significantly more time than most tenants expect. Being realistic at this stage prevents last-minute stress.
Complete Repairs Before You Deep Clean
One of the most common mistakes tenants make is cleaning first and repairing later. Any minor repairs (filling small holes, tightening handles, and touching up scuffs) should be completed before detailed cleaning begins. Repairs create dust and debris. If done afterwards, you risk undoing your own hard work. As professional end of tenancy cleaners, our advice is: always prepare the property first and clean last. Following this rule will save you time.
How Much Time Should You Set Aside?
End of tenancy cleaning is not standard domestic cleaning. It is closer to a property reset. However, time is consistently underestimated. A professional team may complete a two-bedroom property in one day, but that is because several cleaners work simultaneously in a fully empty property. When cleaning alone, the pace is entirely different.
Even a two-bedroom, well-maintained flat can take 3 to 5 days of thorough cleaning. Larger properties may take a full week, particularly if you are packing and organising simultaneously. Begin the end of tenancy cleaning one to two weeks before your move-out date. Spreading tasks over several days prevents exhaustion and reduces the risk of overlooking important details.
Clean Gradually If You Are Still Living in the Property
If you can’t spare several full days of cleaning, begin in stages – you can spread the process over a few weeks if necessary. Bathroom limescale can be treated repeatedly over two weeks. Oven racks can be cleaned separately from the oven. Cabinet interiors can be vacuumed and wiped as you pack. Breaking the end of lease cleaning into smaller, manageable steps will reduce your stress and improve the final results.

Having everything at hand is the secret to an efficient DIY end of tenancy cleaning.
Prepare Your Equipment Before You Begin
Stopping mid-task to buy extra supplies disrupts momentum and extends the timeline. Here’s a list of end of tenancy cleaning supplies to prepare before you start:
Basic Supplies
- 1–2 dusters
- At least 6–7 microfibre cloths (replace frequently)
- Mop and bucket
- Broom
- Gloves
- Old toothbrushes
- Scrubbing brushes
- Sponges & scouring pads
- Scraper (Use a specialised scraper for hobs/glass stains instead of scouring pads to avoid permanent scratches!)
- Old towels (very important for freezer defrosting)
- Paper towels
Cleaning Products
- Bleach
- Limescale remover
- Toilet limescale tablets
- Degreaser (use carefully)
- Multi-surface polish
- Furniture polish
- Mould remover
- Oven cleaner
Equipment
- Vacuum cleaner with attachments (minimum: furniture nozzle)
- Steam cleaner (optional but very helpful for loosening dirt)
NB: Ventilation is essential when using all types of heavy-duty products such as limescale cleaners, bleach, and degreasers.

Experienced end of tenancy cleaners strictly follow a few rules that help them work more efficiently and achieve immaculate results.
The Cleaning Order Professionals Follow
Cleaning in the proper order makes a dramatic difference and saves time. Professionals work systematically to avoid repeating tasks.
Start with Dusting from Top to Bottom
Dusting always comes first. Begin with ceilings, light fixtures, and the tops of doors before moving downwards. Spider webs in corners, the tops of wardrobes, and the upper edges of door frames are areas inspectors often check immediately. If you mop or wipe surfaces before removing the dust above, it will simply fall back onto the freshly cleaned areas.
Vacuum Beyond the Floors
Vacuuming is not limited to carpets. Use the different attachments to clean skirting boards, inside cupboards, wardrobes, radiators, and corners. Removing loose dust and hair before washing or mopping surfaces prevents smearing and improves overall results.
Pay Attention to High-Touch Areas
Door handles, light switches, sockets, and window handles accumulate invisible grease. These areas frequently cause inspection failures because they are handled daily yet rarely deep-cleaned. When using a degreaser, apply it to a cloth instead of spraying it directly onto surfaces. After removing the dirt, wipe the surfaces again with a clean, damp cloth to remove any residue and finish with a dry polish if needed. Replace your cleaning cloths regularly to prevent streaks and smears, especially on glass and glossy finishes.
Read also: 10 Simple Ways to Remove Stickers From Any Surface

Another trick you can borrow from professional end of tenancy cleaners: degrease every kitchen surface, even if it doesn’t look dirty.
Kitchen: Where Most Deposits Are Lost
In kitchens, grease and cooking vapours build up gradually. Even if the surfaces appear clean at first glance, inspectors always check edges, tops, and hidden areas, so you need to be diligent when cleaning the kitchen.
Cleaning the Oven Thoroughly
Oven cleaning requires patience. Remove racks and trays first. Placing them in the dishwasher and running multiple cycles, if necessary, is a simple but effective technique. Apply oven cleaner and let it work for a while before scrubbing. Most of the effort comes from not allowing the product enough time to break down grease. Avoid applying any product directly onto heating elements. Residue left behind can create strong fumes when the oven is switched on during inspection.
Check also: Ultimate Guide on How to Clean a Heavily Soiled Oven
Cooking Hobs
Make sure to remove any scorched food and grease stains with a degreaser. Sometimes the glass hobs might still look dirty even after a good scrubbing. Turn the hob until it is slightly warm, then turn it off, spray it with a degreaser, and leave it to cool. Use a dedicated scraper to remove any residues.
Extractor Fan
The cooker hood often gets overlooked during a DIY cleaning. In London rentals, “greasy extractor filters” are one of the top reasons for a £30-£50 deduction. Wipe the exterior with a cloth sprayed with degreaser to dissolve any caked-on grease. Also, make sure to clean the filter! You can remove it and soak it in a degreaser solution.
Defrosting and Cleaning the Freezer
Defrosted the freezer at least 24 hours before cleaning. Don’t forget to place old towels underneath to absorb water and prevent damage to the flooring, particularly wooden surfaces. Once defrosted, wipe all internal surfaces and ensure the appliance is fully dry before closing.
Cabinets and Hidden Grease
Kitchen cabinets often appear clean but hide grease along the top edges and around handles. Vacuum inside drawers first to remove crumbs before wiping. Degreaser should be applied carefully, then followed by a damp cloth to remove the residue. Inspectors frequently check the tops of cabinets where cooking vapours settle unnoticed.
Dishwasher and Filter
Remove and wash the dishwasher filter thoroughly. Running an empty hot cycle with a dishwasher cleaner helps remove internal buildup and odours.
Kitchen Light Fixtures
Over time, cooking vapours accumulate on light fittings. Wipe carefully using a cloth sprayed with a degreaser rather than spraying directly onto the fixtures to avoid electrical risks and surface damage.
Read also: Ultimate Guide: How to Clean Your Washing Machine

You can use limescale remover to clean any hard water stains from mirrors or glass shower doors.
Deep Bathroom Cleaning
Spotless bathrooms require time and patience. Aggressive and abrasive chemicals or rushed scrubbing can permanently damage chrome fixtures.
Removing Limescale Safely
Apply limescale remover and allow it to sit for 15 to 60 minutes before scrubbing. For heavier buildup, you can repeat this treatment over several days instead of attempting to remove everything at once. Avoid combining strong acidic products with hot water, as heat intensifies chemical reactions and can damage finishes.
Toilet Limescale Treatment
If there is stubborn toilet buildup, use toilet cleaning tablets. Leave them overnight – they will soften deposits and reduce the need for aggressive scrubbing the next day.
Treating Mould and Grout Staining
Bleach-based cleaners are effective against mould and orange bacterial staining. For vertical silicone seals, soaking cotton pads in bleach and pressing them onto affected areas allows prolonged contact and better results.

Cooking vapours leave a sticky film on kitchen floors that often builds up unnoticed. Degrease them thoroughly to pass the final inspection.
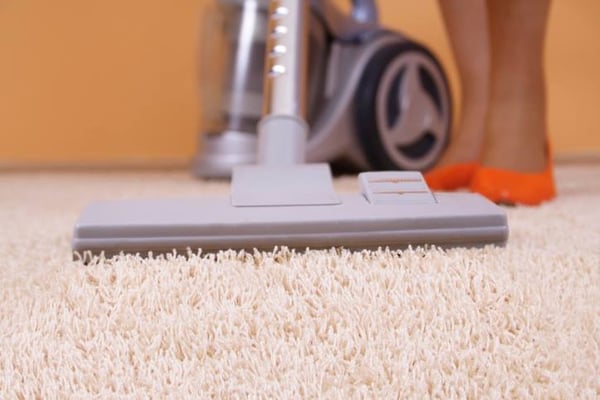
Floors and Carpets
All floors and carpeted areas should be vacuumed thoroughly before any further cleaning. Also, if you don’t vacuum the hard floors and tiles before mopping, hair, lint, and crumbs will be left behind, creating a messy slurry when wet.
Removing Embedded Hair from Carpets
If carpets contain embedded pet or long hair, friction from a clean rubber sole or rubber brush can gather hair into visible clumps before vacuuming. This simple technique can significantly improve the final appearance.
Read also: The Best Ways to Remove Pet Hair Off of Furniture and Carpets
Cleaning Hard Floors Properly
You may need to use a diluted degreaser to lift sticky residue from the kitchen floors. Allow it to sit briefly before scrubbing and rinsing thoroughly. If the floor feels sticky, you might need to repeat the process. Don’t forget to wipe the skirting boards and tiles as well. If you miss this step,grime buildup will make these areas stand out for all the wrong reasons.

Remove pet hair from soft furnishings before you vacuum. A vacuum alone is rarely enough. Use a squeegee, rubber brush, or thick rubber gloves to lift stubborn hair, then vacuum the sofa to remove dust and any loose particles.
Cleaning Soft Furnishings
All soft furnishings should be thoroughly vacuumed to remove any visible hair and lint. Vacuuming also eliminates dust, making the fabrics look brighter. Use the upholstery attachment to vacuum all sofas, armchairs, and mattresses in the property. If there are curtains in your rental, use the soft brush attachment or the upholstery tool along with a low suction setting on your vacuum to extract dust. If the curtains are machine-washable, washing them is the best way to restore their appearance. You can also check our guides on cost effective ways to clean your carpets, mattress, and sofa.
Review the Original Inventory
Before handing over the keys, compare the property carefully with the original inventory report. The objective is to return it to its initial condition, allowing for fair wear and tear. If you do not have a copy, request one. Taking photographs and a short video before departure provides additional reassurance.
When Professional Help May Be the Sensible Option
While many aspects of end of tenancy cleaning can be achieved with time and care, some tasks require specialist equipment to meet inspection standards. Stains on carpets, mattresses, sofas, lead to deductions from your deposit. However, deep carpet cleaning and upholstery stain removal usually cannot be done using household products. Professional cleaners use high-powered extraction machines and commercial steam equipment that are not typically available for domestic use.
In certain cases, the cost of partial deposit deductions may exceed the cost of hiring professionals in the first place. Recognising when to bring in experienced cleaners is a practical financial decision.

Packing and loading belongings always leaves behind dust, lint, and dirt. After moving out, don’t forget to return for final touch-ups: dust high surfaces and polish the floors to perfection.
Securing Your Deposit with DIY End of Tenancy Cleaning
DIY end of tenancy cleaning is entirely possible. It simply demands planning, patience, and attention to detail. The difference between a property that “looks clean” and one that passes inspection usually lies in overlooked areas: the tops of doors, cabinet edges, appliance interiors and filters, and light switches – to name a few. If you approach the process methodically and allow enough time, you can successfully protect your deposit.
And if you decide you would prefer professional support at any stage, Cleaner Cleaner is always here for expert end of lease cleaning, as well as deep carpet, mattress, or upholstery cleaning.